Spring home flooding can occur due to heavy rainfall, snowmelt, or a combination of both. To prevent spring home flooding, here are some tips:
Maintain your gutters and downspouts: Ensure that your gutters and downspouts are clear of debris and are directing water away from your home’s foundation. Make sure that the downspouts are positioned at least five feet away from the foundation.
Install a sump pump: A sump pump can be installed in the basement or crawl space to pump water out of your home if it starts to flood. Make sure to test it regularly to ensure that it is working correctly.
Elevate important items: If you have items in your basement or lower level that are important or valuable, consider elevating them off the floor to prevent water damage.
Seal foundation cracks: Check your foundation for any cracks and seal them to prevent water from seeping in.
Install backflow prevention valves: Install backflow prevention valves (or another type of flood control system) on all pipes that lead into your home to prevent sewage backup.
Install flood sensors: Install flood sensors in areas of your home that are prone to flooding. These sensors can alert you when there is water present, giving you time to take action
If you’re not sure about any of the items above and would like someone to inspect your home and ensure it is ready for spring, feel free to give us a call or fill out this appointment form and one of The Scottish Plumber’s friendly staff will give you a call to schedule a visit.
Trenchless Sewer Repair is a process Arlington Heights homeowners should become familiar with. With many homes older than a century and lots of old pipes, most residents will at some point experience a problem with their sewer.
Trenchless Sewer Repair Saves Your Lawn
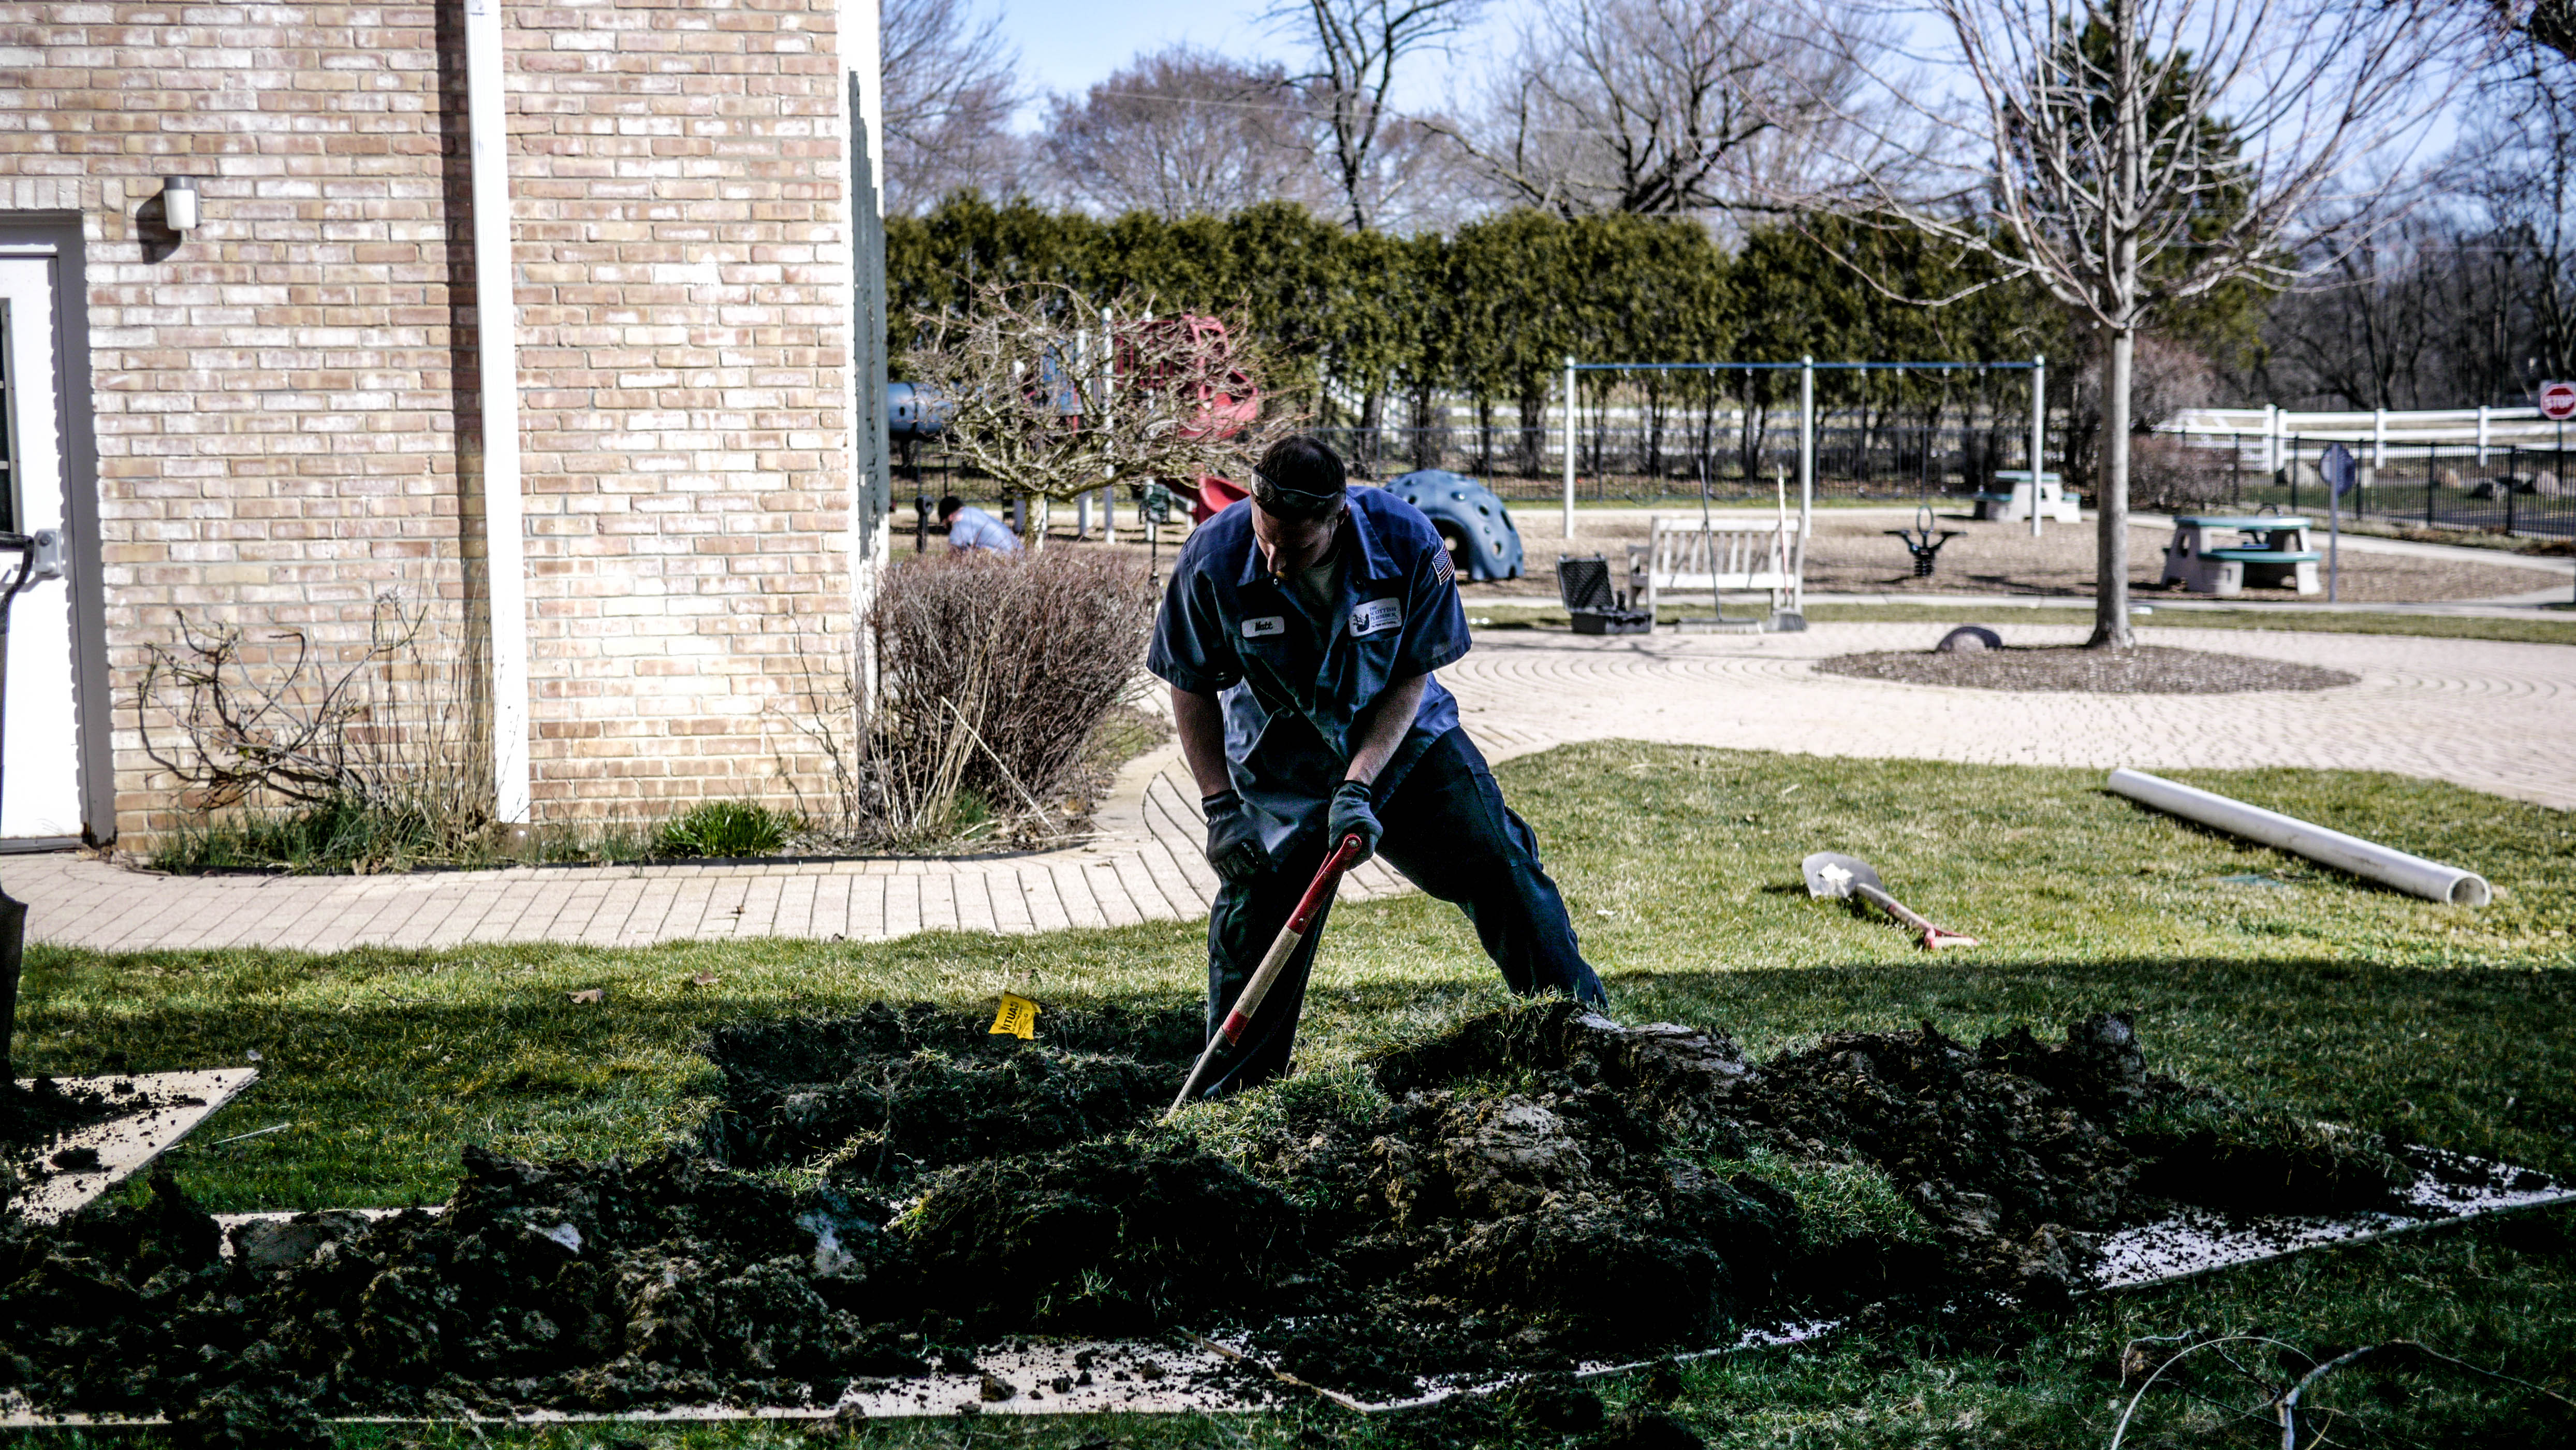
Sewer repair done using conventional methods can be quite messy. It often involves excavation which means either digging in the yard or breaking up the floor. Sometimes the sewer is buried under a deck or stoop, driveway, flower bed or bush – and all of these things have to be removed in order for the repair to proceed.
This is especially painful in a town like Arlington Heights where homeowners take a lot of pride in their outdoor landscapes. What’s worse, after the sewer has been repaired, the homeowner then has to deal with restoration. That’s where the Trenchless method comes in and saves the day.
Conventional sewer repair often requires excavation as you can see in the photo above. Restoring the lawn after the repair can be quite costly and time-consuming.
How Does Trenchless Sewer Repair Work?
There are two types of Trenchless Sewer Repair Arlington Heights customers can take advantage of:
Sewer Liner (also known as Trenchless Sewer Relining or Sewer Lining) – typically used to repair longer sections of pipe – usually 20 feet or longer. It can also be used in place of conventional sewer replacement.
With the Trenchless method, we’re able to install a new pipe inside of the damaged pipe using woven fiberglass, resins, and hardeners. This new pipe is not only stronger than any existing pipe (see video at bottom of page), but it is smooth and seamless to ensure proper flow.
Clay pipe, which is very common in old Arlington Heights sewer construction, is notorious for allowing roots to penetrate through the pipe connections, called joints. Trenchless Sewer Repair completely seals off any joints over which it’s installed and it is completely resistant to roots.
Watch the Pipe Stent Trenchless Repair process in this short video:
Trenchless Sewer Repair Saves You Money
Trenchless Sewer Repair is less expensive than conventional repair and that’s before you even take the costs of landscape restoration, stoop replacement, or deck repair into account. It also comes with a 50-year warranty, which is significantly longer than the typical warranty on conventional sewer repair or replacement.
The Scottish Plumber has some of the most experienced staff in the industry when it comes to Trenchless. We have done hundreds of such installations all over Chicagoland, many of them in Arlington Heights, so homeowners can rest easy that the job will be done quickly and properly by a trained and experienced professional.
In this short video, we test the strength of the Pipe Stent using a sledgehammer and some elbow grease.
For more information or to schedule a free estimate, use the red appointment form at the top of this page, give us a call, or contact us here.
Sewer relining is a bit more challenging in the winter months but it can be done with the proper equipment, some pre-planning and experienced technicians. Even though we were ready for the weather we ran into a few problems we did not foresee. The pipes in the traveling boiler froze so we had to thaw them with a blow torch. The project was definitely a success but we did double our labor costs due to the cold. The problem at this house was a root clogging the sewer line causing a back-up into the house. After cleaning the roots outwe saw that the the pipe was broken allowing sewage to leak into the yard attracting more roots into the sewer line. This job was an emergency situation and we moved very quickly from diagnosing the problem to making the repair.
Preparing the soft liner for epoxyRyan preparing part of the re-lining equipment
Inserting the soft liner through the clean-out in the front yard
This Cured In Place Pipe (CIPP) is also known as Trenchless Sewer Repair because there is no digging involved. Compared to the old fashioned excavation method this CIPP cost 1/2 as much and takes about a day and half to complete. This is considered a specialty among plumbers since this equipment is expensive and most won’t invest in it. It also takes special technicians with the technical training and a extensive background in the history of sewers since this CIPP is almost always performed on old complicated sewer systems. Chicago has miles of aging sewers as do other cities and this technology is being used across the country by municipalities who now dont have to dig up roads to fix them. The federal goverment has mandated that cities have to repair broken & craked municapall sewers because of the environmental impact it is having on local lakes, rivers and streams.
Scones (from Gaelic word “sgoon”) are a favorite in Scotland and around the world
Ingredients
1 3/4 cups all-purpose flour
1/4 cup white sugar
4 teaspoons baking powder
1/8 teaspoon salt
5 tablespoons unsalted butter
1/2 cup dried currants of your choice
1/2 cup milk
1/4 cup sour cream
1 egg
1 tablespoon milk
Directions
Preheat the oven to 400 degrees F (200 degrees C).
Sift the flour, baking powder, sugar and salt into a large bowl. Cut in butter using a pastry cutter until it is in pea sized lumps. Stir in the currants. Mix together 1/2 cup milk and sour cream in a measuring cup. Pour all at once into the dry ingredients, and stir gently until well blended. DO NOT OVERWORK THE DOUGH
With floured hands, pat scone dough into balls 2 to 3 inches across, depending on what size you want. Place onto a greased baking sheet, and flatten lightly. Let the scones barely touch each other. Whisk together egg and 1 T of milk. Brush the tops of the scones with the egg wash. Let them rest for 10 minutes.
Bake for 10 to 15 minutes in the preheated oven, until the tops are golden brown, not deep brown. Break each scone apart, or slice in half. Serve with butter or clotted cream and a selection of jams – or even plain.
These tender/crumbly, full-flavored scones feature cranberries and pecans. With oats in the dough, they’re a tasty throwback to their Scottish origins.
2 cups (8 1/2 ounces) King Arthur Unbleached All-Purpose Flour
1 cup (3 ounces) old-fashioned rolled oats or quick-cooking (not instant) oats
1 tablespoon baking powder
1/2 teaspoon baking soda
3/4 teaspoon salt
1/2 cup (3 3/4 ounces) brown sugar, packed
1/2 cup (4 ounces, 1 stick) butter
1 cup (4 ounces) dried cranberries
1 cup (4 ouces) diced pecans
1 cup (8 ounces) buttermilk, sour cream, or plain yogurt
coarse sparkling sugar for topping, optional
Preheat your oven to 375°F. Lightly grease a baking sheet, or line with parchment.
Mix the dry ingredients in a large mixing bowl. Mix the butter into the dry ingredients until it looks unevenly crumbly. Mix in the fruit and nuts until they’re evenly distributed. Stir in the buttermilk.
Turn the dough out onto a well-floured surface and cut it into two pieces. (Keep sprinkling on flour if you need to.) Form each into a disk, and gently pat each disk into a round about 6″ in diameter. Sprinkle each disk with coarse sparkling sugar, if desired. With a bench scraper or sharp knife, cut the round into 8 wedges. Do this by cutting straight down through the dough so you shear the edges. If you saw the dough, you tend to press the edges together, which keeps the scones from rising as they bake. Don’t separate the wedges.
Transfer the scones, still in their circular shape, the the prepared baking sheet. Separate the scones slightly; there should be about 1″ between them at the outside edge. Bake the scones for 20 minutes, or until they’re just beginning to brown. Remove them from the oven, and serve warm. Or reheat for 10 minutes, lightly tented with foil, in a preheated 350°F oven. Serve with traditional clotted cream or Devon cream, if desired. Yield: 16 tea scones.
Ingredients:
4 cups all-purpose flour
2 tablespoons baking powder
1/4 cup granulated sugar
1/4 teaspoon salt
3 tablespoons grated lemon peel
1/2 cup butter (cut into 1/2-inch pieces)
2 eggs, beaten
2/3 cup milk
1 cup dried cranberries are a nice addition to this recipe
Directions:
Preheat oven to 450degrees F. Grease and flour baking sheet.
Sift flour, sugar and salt in bowl. Stir in peel. Cut in butter until mixture resembles coarse meal. Blend in eggs and just enough milk to form soft but not sticky dough. Turn dough out onto lightly floured surface. Gently roll or pat dough to about 1/2-inch thickness, lightly flouring as necessary to prevent sticking.
Cut out rounds using 2-inch floured biscuit cutter. Set 1/2-inch apart on prepared baking sheets. Brush with cream or milk for a rich sheen. Bake until scones are golden brown, 12 to 15 minutes.
Lemon Glaze -After baking add glaze as desired
In small bowl: add 1 cup powdered sugar and lemon juice to desired consistency. Drizzle over lightly cooled scones.
This small batch of savory scones are very biscuit-like and taste best warm with a generous dab of butter or margarine.
Ingredients:
1/2 cup whole wheat flour
1 1/2 cups unbleached flour
2 tablespoons brown sugar
1/4 teaspoon salt
1 teaspoon baking powder
1/2 teaspoon baking soda
2 tablespoons butter or margarine
1 tablespoon honey
1 tablespoon dried rosemary
2/3 cup milk
Directions:
Preheat oven to 400 degrees Fahrenheit. Grease and flour a baking sheet. Sift together dry ingredients (flours, sugar, salt, baking powder, baking soda) in a large bowl. Using a pastry blender or a fork, cut in the butter or margarine until it is evenly distributed in the flour mixture and resembles cornmeal.
Add the rosemary, honey, and milk; and mix to form a soft dough. Add more milk one tablespoon at a time if the mixture is too dry and does not come together into a ball of dough. Roll the dough out onto a lightly flour surface and pat it into 1/2 inch thickness. Using a small cup or cookie cutter about 2 inches across, cut the dough into shapes and place them on the baking sheet. Bake 15 to 20 minutes or until golden brown. Cool on a wire rack.
This is a sweet and chocolatey scone, but not too sweet or filling; with a cake-like consistency and a hint of banana flavor.
Ingredients:
2 cups all-purpose flour
1/2 cup packed light brown sugar
2 teaspoons baking powder
1/2 teaspoon baking soda
1/4 teaspoon salt
1/4 cup butter or margarine
1 ripe mashed banana
1 large egg
2 tablespoons buttermilk
1 teaspoon vanilla extract
1/2 cup semi-sweet chocolate chips
Directions:
Preheat oven to 400 degrees Fahrenheit and lightly grease the center of a baking sheet. In a large bowl, whisk together the flour, brown sugar, baking powder, baking soda, and salt. With a pastry blender, cut the butter or margarine into the flour mixture until it resembles coarse meal. In a separate small bowl, stir together the egg, mashed banana, buttermilk and vanilla extract until the consistency is relatively even.
Pour the banana mixture into the flour mixture and combine until a dough forms. The dough will be sticky. Spread the dough into the center of the cookie sheet and form it into a 9-inch circle. With a floured knife, cut the circle into 8 wedges, but do not separate them. Bake for 19-21 minutes or until golden brown and a toothpick inserted into the center of the circle comes out clean.
Remove and place on a cooking rack- you may have to re-cut the wedges before transferring. Enjoy!
Most homeowners don’t start thinking about their water heater until it suddenly stops working; which means they don’t have much time to shop around for the best deal and the most energy efficient model on the market. When there’s no hot water in your home and you’re aching for a nice hot shower, you’ll take any water heater you can get as long as it’s working, right?
Between 13% and 17% of residential energy consumption in the United States comes from water heaters- that’s a pretty big portion of our energy usage. And like the “cash for clunkers” government program is urging motorists (with generous tax incentives) to upgrade their gas-guzzling vehicles for more efficient cars, the Federal Government is also about to unveil a “cash for clunkers appliances” program that provides tax rebates for upgrading energy-sucking appliances like water heaters, dishwashers, refrigerators and washer/dryers for units with better EnergyStar ratings. Some retailers will even be able to give a discount up to 25% of the appliance cost right there at the cash register!
So does this mean homeowners should just hope that if their water heater is going to fail soon, it dies in 2010 so they can take advantage of the program? No! Upgrading your old water heater now can save you even more money. Not only does it mean you get to take part in the limited time tax incentive program, but a more energy efficient water heater can save you $200-$300 a year in energy costs on your gas or electric bill. That means that if you buy a water heater during this “cash for clunkers appliances” program, your investment could pay itself off in the first year or two; then just continue to save you more money than you are spending now to keep your old water heater going.
Here is an article in the Chicago Sun-Times covering the news of the program; and here is a detailed article with more information on water heaters and energy factors from the US Department of Energy. Contact The Scottish Plumber if you’re thinking about taking part in this program to save some money on a new water heater, and we’re going to keep our ears to the tracks for when the program begins. We can take a look at your current water heater and calculate about how much more efficient several options of newer models will be and how much money you could save.
It’s much less stressful to pick out a new water heater while your current water heater is still working, so you’re not worried where your next hot shower is going to come from!
The almond extract in these scones make them sweet-tasting and cookie-like, and the crunchy crumb topping is simply delicious! They are baked together in a circle, so the insides of the scones stay incredibly moist. Definitely one of our favorites so far!
Scones:
½ cup butter or margarine (one stick) – firm
2 cups all-purpose flour
¼ cup granulated sugar
2 ½ teaspoons baking powder
¼ teaspoon salt
½ cup chopped, sliced, or toasted almonds
1 egg
¼ teaspoon almond extract
½ cup milk or half and half
Directions:
Preheat the oven to 400 degrees Fahrenheit. To prepare the crumb topping, cut the butter/margarine into the flour, sugar and almonds, until crumbly; set aside.
For the scones, cut the butter/margarine into the flour, sugar, baking powder and salt with a pastry blender/dough cutter in a large bowl until the mixture resembles fine crumbs. Stir in the almonds. Stir in the egg, almond extract, and a splash of the milk/half and half. Slowly add the milk/half and half and continue to stir- add only enough of the milk/half and half to make the dough stick together and leave the sides of the bowl to form a bowl. Don’t let it get too moist or sticky.
Turn the dough out onto a floured surface, roll it in flour to coat, and knead it 10 times. Pat or roll the dough into a 9-inch circle, then carefully transfer it to an ungreased cookie sheet. Sprinkle with the crumb topping, and lightly press it into the dough to stick. Cut into 8 wedges with a floured knife, but do not separate the wedges. Bake for about 15 minutes, or until golden brown. Insert a toothpick into the center of the circle to be sure- the toothpick should come out mostly clean.
Immediately remove from the cookie sheet, carefully separate the wedges, and place on a cooking rack. If needed, slice them again with the knife to help separate them. Serve warm.


 Scones (from Gaelic word “sgoon”) are a favorite in Scotland and around the world


 This is a sweet and chocolatey scone, but not too sweet or filling; with a cake-like consistency and a hint of banana flavor.
 Pour the banana mixture into the flour mixture and combine until a dough forms. The dough will be sticky. Spread the dough into the center of the cookie sheet and form it into a 9-inch circle. With a floured knife, cut the circle into 8 wedges, but do not separate them. Bake for 19-21 minutes or until golden brown and a toothpick inserted into the center of the circle comes out clean.
 owners don’t start thinking about their water heater until it suddenly stops working; which means they don’t have much time to shop around for the best deal and the most energy efficient model on the market. When there’s no hot water in your home and you’re aching for a nice hot shower, you’ll take any water heater you can get as long as it’s working, right?
 Ingredients:
 Directions: