Elmhurst has a lot going for it. Wide streets, excellent schools, a walkable downtown with real restaurants and character, the Illinois Prairie Path winding through the city’s green spaces, and a community identity that manages to feel genuinely local even as the western suburbs have grown up around it. It’s the kind of place people choose deliberately — and then tend to stay.
What a lot of people don’t think about when they fall for an Elmhurst cape cod or a brick ranch on a quiet block off York Road is what’s running through the walls and beneath the yard. Elmhurst is primarily a mid-20th century city — the majority of its housing stock was built between the 1940s and the 1960s, the era of the returning GI and the postwar American suburb. Those homes were well built. They’ve held up remarkably well. But the plumbing systems inside them? They were installed for a different era, with different materials, and many of them have been quietly aging ever since.
Add to that Elmhurst’s complicated relationship with water — the city has a deep history with Salt Creek flooding, combined sewer systems, and the kind of storms that pushed DuPage County to build one of the most ambitious flood control projects in the entire Chicago region — and you have a community where plumbing is not an afterthought. It’s a genuine part of homeownership that deserves real attention.
At The Scottish Plumber, we work in homes across the western suburbs every week. We’ve crawled through post-war basements, diagnosed galvanized pipe problems in homes that haven’t seen a plumber in decades, and helped Elmhurst homeowners understand what they’re actually dealing with before a manageable issue turns into an expensive emergency. This article is the honest overview we wish every Elmhurst homeowner had from day one.
Understanding Elmhurst’s Housing Stock — And Why the Era Matters
Elmhurst was incorporated in the 1880s and grew steadily through the early 20th century, but the city’s defining residential character comes from one specific era: the post-World War II building boom. A full 41 percent of Elmhurst’s housing was built between the 1940s and 1960s — capes, ranches, split-levels, and modest colonials constructed quickly and efficiently to house a generation of families who were starting out with ambition and limited budgets.
That era’s construction has proven durable in many respects. The bones of these homes are often solid, and many have been lovingly maintained and updated over the decades. But plumbing — specifically the materials used for supply lines, drain lines, and sewer connections — was not built to last indefinitely. Galvanized steel supply pipes, clay tile sewer lines, and early cast iron drain systems were all standard in mid-century construction, and all of them have finite lifespans that, for many Elmhurst homes, are now well in the rearview mirror.
Elmhurst also has a meaningful share of older homes — roughly 15 percent of the city’s housing was built before 1939 — and a growing inventory of newer construction filling in lots where teardowns have occurred. But the plumbing challenges most characteristic of Elmhurst are those tied to the postwar boom: aging galvanized pipe, deteriorating sewer lines, and the flooding vulnerabilities that come with mid-century infrastructure facing 21st-century storms.
Water service in Elmhurst comes from the DuPage Water Commission, which sources water from Lake Michigan. That’s a high-quality source — but water quality at the tap is only as good as the pipes it travels through on the way to your faucet. In homes with aging supply lines, that journey can introduce problems the source water never had.
A Brief History of Plumbing in Elmhurst Homes
To understand what’s likely in your walls, it helps to know what was standard practice when your home was built.
Pre-War Homes: Built Before 1940
Elmhurst’s oldest homes were constructed when indoor plumbing was still maturing as a technology. Lead was commonly used for service lines — the pipes connecting homes to the municipal water main — because it was pliable, corrosion-resistant in structure, and easy for plumbers of the era to work with. The health implications of lead in drinking water were not well understood for decades.
Cast iron was the standard for drain lines in this era. These pipes have served many Elmhurst homes for the better part of a century, but at that age, they are at genuine risk of internal scaling, cracking, joint failure, and tree root intrusion. Pre-war homes that have never had their sewer lines inspected or replaced are carrying infrastructure that is now very old by any measure.
The Postwar Era: 1940s Through 1960s
This is the heart of Elmhurst’s housing stock, and the era that defines the plumbing challenges most homeowners in the city are dealing with today. Galvanized steel pipe became the dominant material for supply lines during this period — an improvement over lead in terms of health safety, but a material with a well-documented and unavoidable end-of-life problem.
Galvanized pipe is steel coated in zinc to resist corrosion. Over time — typically 20 to 50 years, depending on water chemistry and conditions — the zinc lining depletes, and the bare steel begins to oxidize from the inside out. The result is a pipe whose interior diameter gradually narrows as rust and mineral deposits accumulate, reducing water pressure and introducing rust and sediment into the water supply. Eventually, the pipe can fail entirely — often without warning, sometimes inside a wall or ceiling.
Homes of this era also used clay tile for sewer lines as standard practice. Clay tile is durable when conditions are stable, but it is highly vulnerable to root intrusion at the joints between pipe sections — and Elmhurst’s mature tree canopy creates exactly the conditions under which roots aggressively seek out sewer line moisture. A clay tile sewer in a postwar Elmhurst home that has never been inspected is very likely carrying some degree of root intrusion.
The Modern Era: 1970s Through Present
Homes built from the 1970s onward typically transitioned to copper supply lines — which are far more durable than galvanized steel and remain the quality standard today. A properly installed copper system can last 50 to 100 years. However, copper is not invincible: aggressive water chemistry, improper installation, or the pinhole corrosion that can develop over decades can all cause failures, often in places that aren’t visible until water damage has already occurred.
More recent renovations and new construction increasingly use PEX tubing — flexible, freeze-resistant, and easier to run through tight spaces in older homes. When properly installed, PEX is an excellent material for residential plumbing and a sensible upgrade in homes that are being repiped.
Elmhurst has also seen significant teardown-and-rebuild activity, particularly in desirable neighborhoods. If you’re in a newer home built on a lot where an older structure previously stood, your interior plumbing is likely modern — but you may still be connected to older municipal infrastructure, and the lot’s drainage patterns from the previous structure may affect how your home handles stormwater.
The Specific Challenges Elmhurst Homeowners Face
1. Lead Service Lines: The City Is Actively Tracking This
The City of Elmhurst has been transparent and proactive on the lead service line issue. In accordance with Illinois’ Lead Service Line Replacement and Notification Act, the city has built an online tool that allows homeowners to look up whether their property has a lead service line on record. If your home was built before 1988, the city’s guidance specifically notes you are more likely to have lead in your plumbing system.
Beyond the service line itself, the city also advises homeowners to identify and replace plumbing fixtures containing lead — including brass faucets, fittings, and valves, which may leach lead into drinking water. Products sold after January 4, 2014 must by law contain very low lead levels, so older fixtures in pre-2014 homes are a genuine consideration.
The City of Elmhurst has a voluntary lead service line replacement program. Under this program, the city will replace the lead portion from the water main to the valve in the public right-of-way at no cost to the resident — but the private side of the service line, from the right-of-way to your home, is the property owner’s responsibility and expense. This makes it especially important to understand what you have and to act in coordination with the city’s program rather than waiting until a repair forces the issue.
As with Winnetka, Illinois law as of January 1, 2022 no longer allows partial replacement of lead service lines. If any portion of your line is lead and work is performed on it, full replacement is required. The sooner you know your status, the more control you have over the timing and cost of that work.
To reduce exposure in the meantime: run cold water for two to three minutes before using it for drinking, cooking, or mixing baby formula or food — particularly first thing in the morning or after periods when the water has sat in the pipes. A water filter certified to NSF/ANSI Standard 53 for lead reduction provides additional protection while a full replacement is being planned.
2. Galvanized Pipe: The Most Common Hidden Problem in Postwar Elmhurst Homes
If you live in a home built between the 1940s and late 1960s and the supply lines have never been replaced, there is a strong likelihood you are still running water through galvanized steel pipe. This is the single most common plumbing problem we encounter in postwar suburban homes across the Chicago area, and Elmhurst — with its deep concentration of housing from exactly this era — is no exception.
The symptoms of deteriorating galvanized pipe are easy to recognize once you know what to look for. Reduced water pressure at upper-floor fixtures is a telltale sign — the pipe’s interior has narrowed with buildup. Discolored water, particularly a rust-orange tinge that appears after the water has been sitting in the pipes overnight, is another. A faint metallic taste. Low pressure at a specific fixture that seems inexplicably worse than others. These are not cosmetic nuisances — they are signals of a supply system in active decline.
A plumber can assess galvanized pipe condition through visual inspection of accessible sections and pressure testing. A camera inspection can also evaluate sections that aren’t visible. Depending on the extent of deterioration, the answer may range from targeted replacement of the worst sections to a full repipe of the home’s supply system. Upgrading to copper or PEX eliminates the problem at its source, improves water quality and pressure immediately, and removes the risk of a sudden in-wall pipe failure.
3. Clay Sewer Lines and Root Intrusion: Elmhurst’s Tree Canopy Is Beautiful and Problematic
Elmhurst’s mature trees are one of the city’s most beloved features. They also present one of its most persistent underground plumbing challenges. Tree roots seek moisture with remarkable persistence, and the joints between sections of clay tile sewer pipe — which is porous and permeable in ways that modern PVC pipe is not — are precisely the kind of environment roots are drawn to.
In a postwar Elmhurst home with the original clay tile sewer line, some degree of root intrusion is not just possible — it’s probable. Roots that have found their way into a sewer line don’t stop growing. Left unaddressed, they expand until they restrict or completely block the pipe, causing slow drains, gurgling, and eventually a full sewer backup into the basement.
Root intrusion isn’t always dramatic in its early stages. A line can be 30 or 40 percent restricted before noticeable symptoms appear. By the time a homeowner calls for help, the situation is often significantly more advanced than they expected. A sewer camera inspection — in which a small camera is run through the line to document conditions — is the definitive way to know what you’re dealing with. For any Elmhurst home over 40 years old that has never had this done, it is one of the highest-value preventive investments you can make.
Hydro-jetting can clear root intrusion and buildup from a sewer line, buying time. But in cases of significant root infiltration or cracked and offset pipe sections, replacement or relining of the sewer line is the permanent solution.
4. Flooding, Salt Creek, and What the City’s Own History Tells You
Elmhurst has a long and well-documented relationship with flooding. Salt Creek — which runs through and along the western edge of the city — has been both a defining geographic feature and a recurring flood threat throughout Elmhurst’s history. The 1987 storm, which dropped 9.5 inches of rain in 24 hours and caused massive flooding throughout Chicagoland, was a turning point: it drove DuPage County to enact a comprehensive stormwater management plan and ultimately to build the Elmhurst Quarry Flood Control Facility, which opened in 1993 and is now the largest of DuPage County’s 17 flood control facilities, capable of holding 2.7 billion gallons of floodwater.
The quarry facility, along with the city’s levee system — which runs for over a mile and protects more than 1,400 homes — has dramatically reduced the overbank flooding risk from Salt Creek itself. The city’s stormwater plan also notes that Elmhurst’s storm sewer system was separated from the sanitary sewer system in 1968, which is a meaningful improvement over combined systems still found in some older communities.
But flood risk in Elmhurst has not been eliminated — it has been managed. The city’s own stormwater resources identify several distinct flooding types that still affect Elmhurst homeowners: overland flooding when storm sewers are overwhelmed during intense rainfall events, seepage through foundation walls and window wells, and sewer backup in homes where the sanitary connection is still a gravity-fed system that can be pressurized during heavy storms.
For homeowners, this means that the infrastructure has improved significantly — but your home’s individual vulnerability still depends on where it sits relative to drainage patterns, whether your basement has a proper sump pump system, and whether your sanitary sewer connection provides protection against backpressure during a significant storm. These are not abstract concerns. They are practical questions with practical answers, and a qualified plumber can help you understand your home’s specific situation.
5. Sump Pumps: Not Optional in Elmhurst
If you have a basement in Elmhurst — and most homes here do — a functioning sump pump is not a luxury. It is a fundamental piece of infrastructure. DuPage County’s storms are capable of producing rainfall that overwhelms local drainage systems quickly, and when that happens, the homes that stay dry are the ones with properly sized, properly maintained sump pump systems.
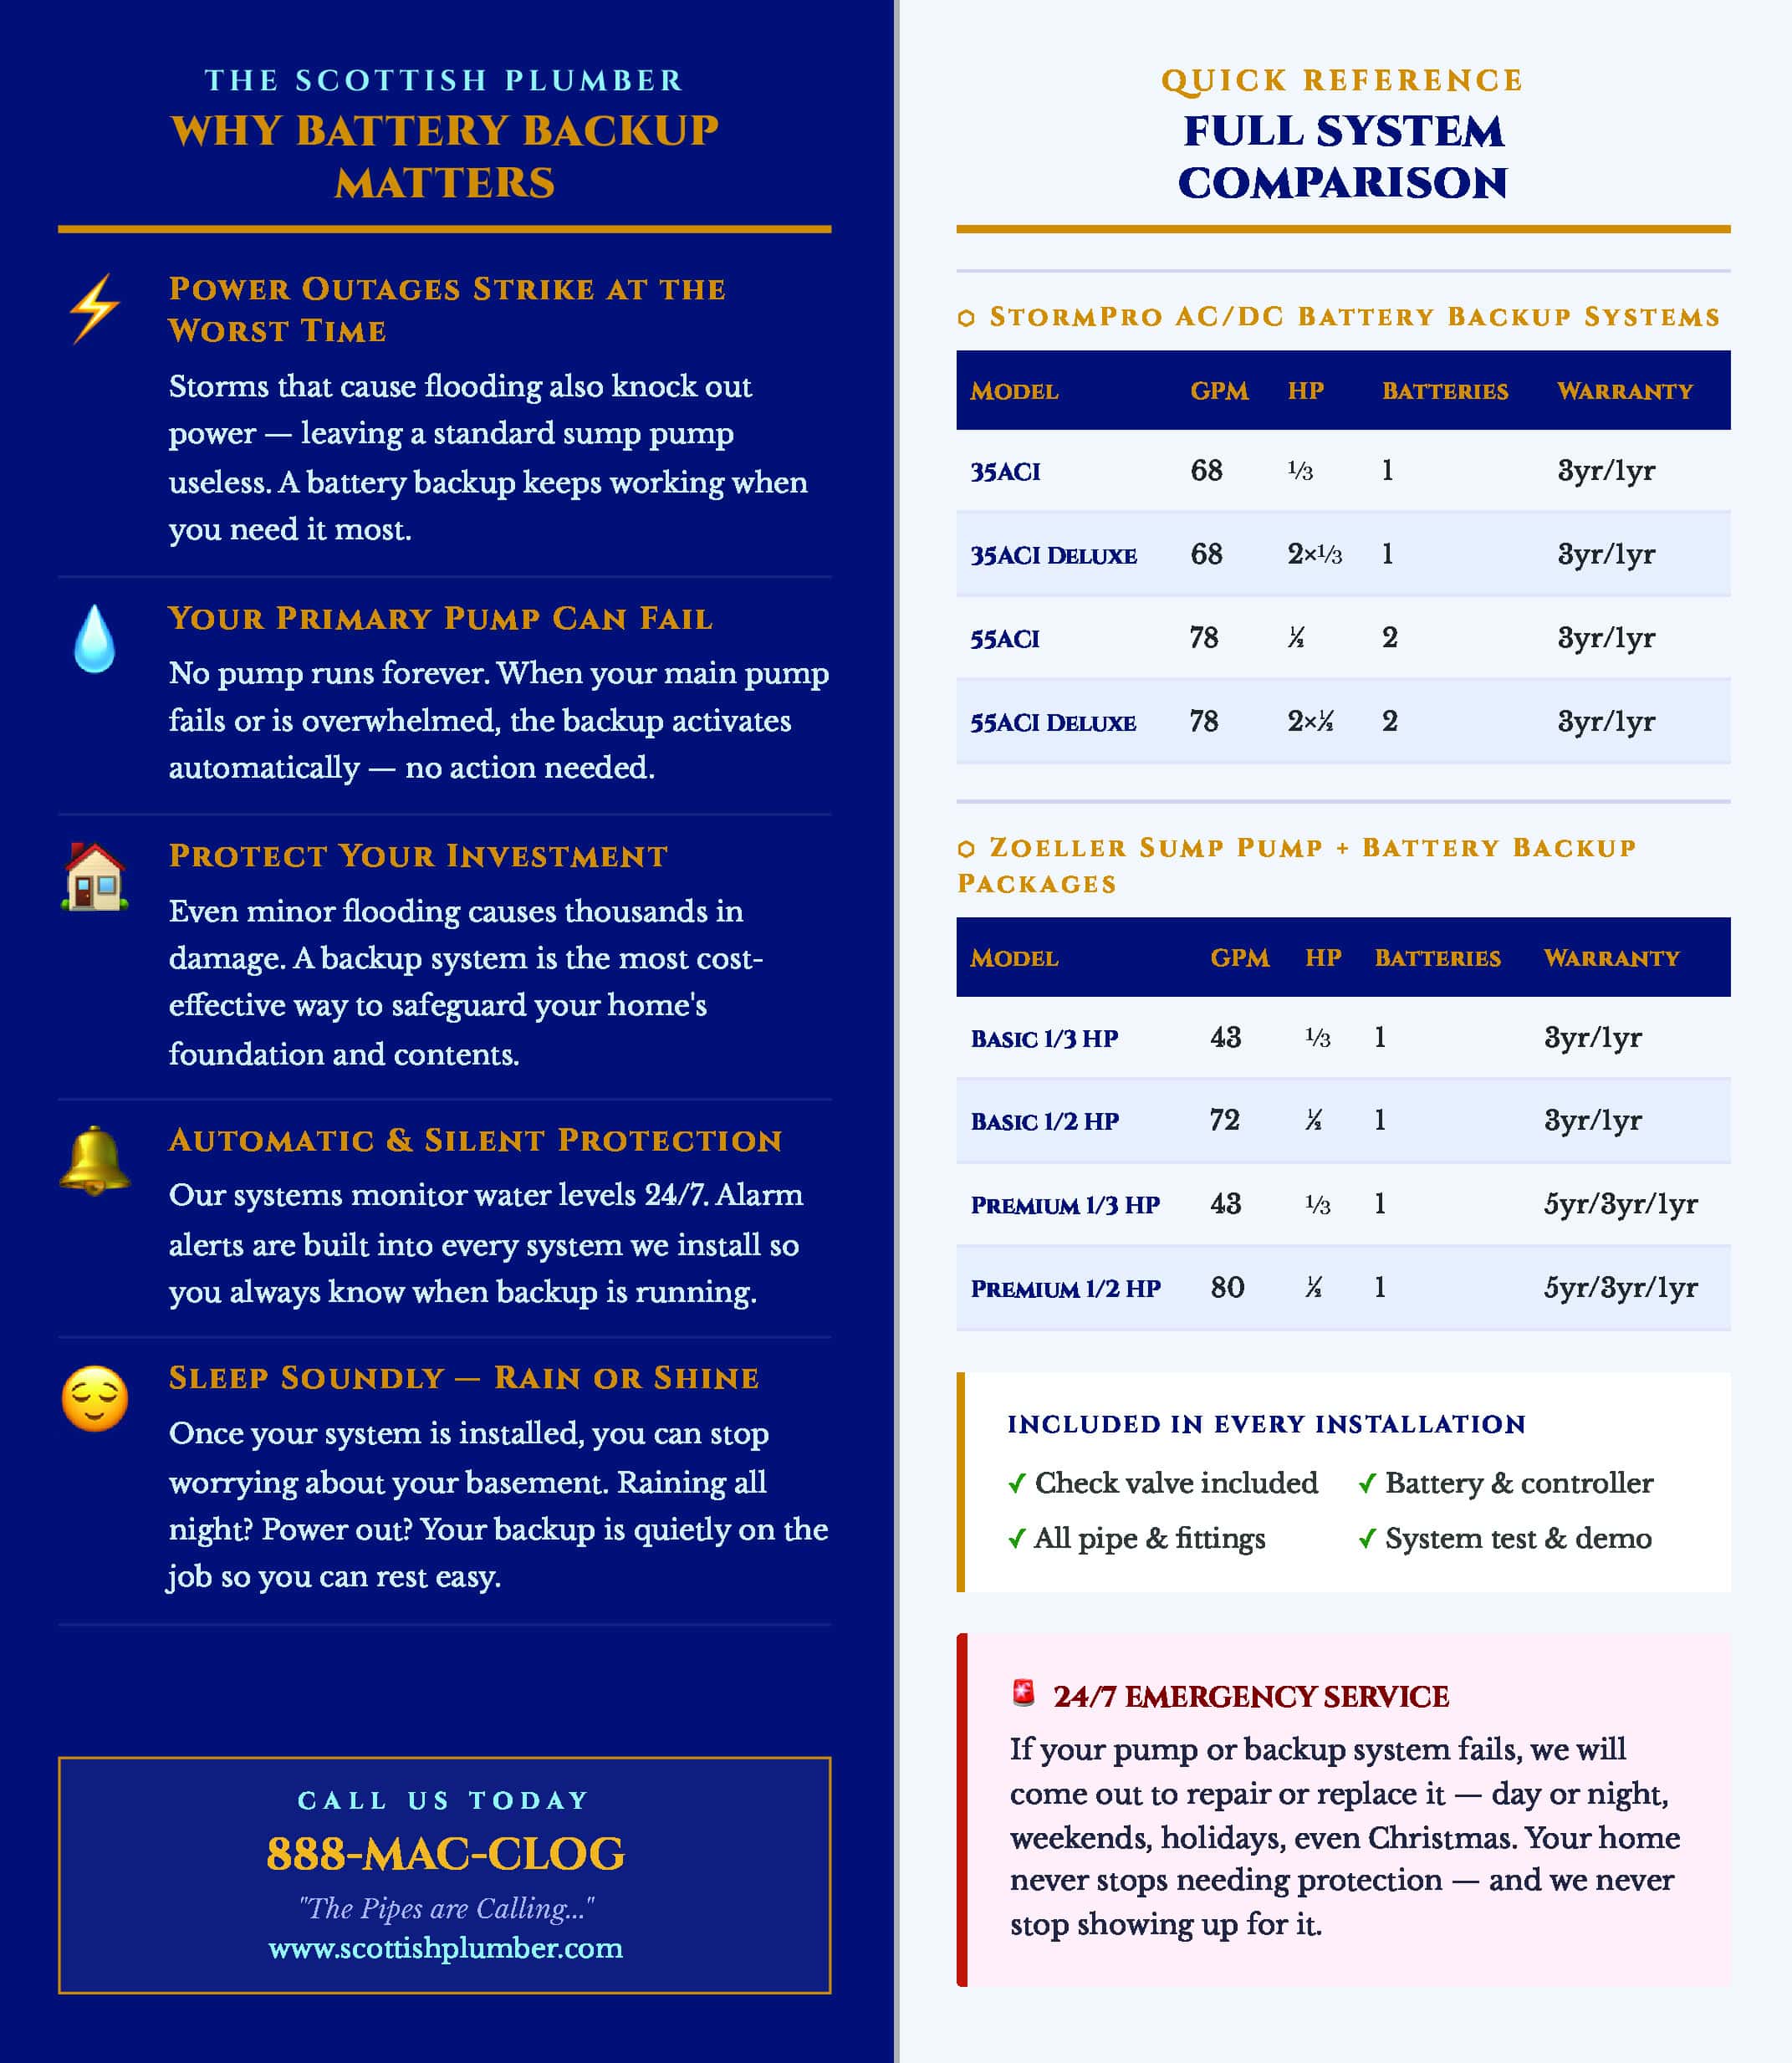
The most common sump pump failure pattern we see is entirely predictable and entirely preventable: a pump that was installed years ago, never serviced, and fails during the first major storm of the season — which is also, typically, when the power goes out. A battery backup sump pump addresses this directly. It operates independently of your home’s power supply and activates automatically when the primary pump fails or the power goes down. For a city with Elmhurst’s storm history, a battery backup is not an upsell — it is the responsible standard.
If your primary sump pump is more than seven to ten years old, have it inspected before the spring rain season. If you have experienced basement water intrusion or sewer backup in the past, talk to a plumber about interior flood control systems and overhead sewer conversions — engineered solutions that address the root cause permanently rather than managing the symptoms each season.
6. Frozen Pipes: DuPage County Winters Are Not Gentle
Elmhurst sits inland from Lake Michigan, which means it lacks even the modest lake-effect temperature moderation that North Shore communities like Winnetka experience. DuPage County winters can be brutally cold, with extended sub-zero periods that put significant stress on any water supply pipe running through an unheated or inadequately insulated space.
Post-war homes are particularly vulnerable here, because insulation standards in the 1940s and 1950s were dramatically lower than what we consider adequate today. Pipes that run through exterior walls, unheated attached garages, crawl spaces, or unfinished basement areas are all at risk when temperatures drop sharply. When water freezes inside a pipe, it expands with enough force to crack or burst even metal pipe — and the damage doesn’t reveal itself until temperatures rise and the water flows again, sometimes through a gap inside a wall or ceiling that has been developing for hours.
The steps to prevent pipe freezing are straightforward: insulate exposed pipes in unheated spaces, disconnect and drain outdoor hoses before mid-October, keep your home’s heat at a minimum of 55°F when you’re away, and know exactly where your main water shutoff is located and confirm it turns freely. A shutoff that requires tools or significant force to operate is a shutoff that won’t help you much during an actual emergency.
7. Water Quality and Mineral Buildup
Elmhurst’s water comes from Lake Michigan via the DuPage Water Commission — a reliable, high-quality source. But even good source water picks up minerals and characteristics as it travels through distribution pipes, and those characteristics interact with your home’s plumbing in ways that accumulate over time.
In homes with older pipes — particularly galvanized steel supply lines or aging cast iron drain lines — city water can pick up additional iron, rust, and sediment on its way to your faucet. Water heaters accumulate mineral sediment at the bottom of the tank, insulating the heating element and reducing efficiency. Faucet aerators and showerheads develop mineral scaling that restricts flow. These are not dramatic failures, but they are steady drains on your fixtures, appliances, and water heater’s lifespan.
Many Elmhurst homeowners find that a whole-house water filtration system or water softener addresses these issues comprehensively — improving the taste and quality of drinking water, reducing scale buildup on fixtures and appliances, and extending the life of the water heater. If you’ve noticed white or yellowish deposits on fixtures or your water has a metallic edge to it, it’s worth having a plumber assess both your pipe condition and your water treatment options together.
8. Aging Water Heaters
The average tank water heater has a rated lifespan of 8 to 12 years. In our experience, a significant number of homeowners don’t think about their water heater until it stops working — which, in a finished basement or utility area, usually means water on the floor before they realize there’s a problem.
If your water heater is between 10 and 15 years old, it is operating in borrowed time territory. Signs that replacement is approaching include: visible rust or corrosion on the tank or connections, a rumbling or popping sound during heating cycles (caused by mineral sediment on the tank floor), inconsistent hot water delivery, or a noticeable increase in your gas or electric bill that isn’t explained by usage changes.
Tankless water heaters have become an increasingly popular upgrade in Elmhurst homes — particularly in larger homes where demand for hot water is high and storage-tank limitations become frustrating. Tankless units provide continuous hot water on demand, are more energy-efficient over time, and take up a fraction of the space of a traditional tank. They require proper sizing for the home’s peak demand and appropriate venting, but for many Elmhurst households they represent the right long-term answer.
What You Can Do Right Now: A Preventive Checklist for Elmhurst Homeowners
- Check the city’s lead service line database. The City of Elmhurst has an online tool specifically for this. If your home was built before 1988, look it up. If your line is confirmed or suspected lead, contact the city about its voluntary replacement program and talk to a licensed plumber about the private-side replacement.
- Flush your pipes if you have lead or galvanized lines. Run cold water for 2–3 minutes before using it for drinking, cooking, or mixing baby formula — especially after periods of non-use. Consider a certified NSF/ANSI-53 water filter for drinking water as an added precaution.
- Schedule a sewer camera inspection if your home is more than 40 years old and one has never been done. For a postwar Elmhurst home, this is close to essential. Root intrusion in a clay tile line is far cheaper to address proactively than to discover through a backup.
- Test your sump pump now — before storm season. Pour water into the pit to verify the float triggers the pump. Check that the discharge line is clear and draining away from the foundation. If the pump is more than 7–10 years old or you’ve never serviced it, have a plumber inspect it. And if you don’t have a battery backup, get one.
- Assess your supply lines. If you’re in a postwar home and don’t know whether you have galvanized or copper supply lines, a plumber can tell you quickly by examining accessible pipe in the basement or utility area. If it’s galvanized, get a condition assessment and a plan.
- Insulate exposed pipes before winter. Walk your basement, crawl space, and unheated garage and wrap any exposed water supply pipes with foam insulation before temperatures drop. Disconnect and drain garden hoses by mid-October every year.
- Know where your main shutoff is. Find it, test that it turns, and make sure everyone in your household knows where it is. This single piece of knowledge can prevent tens of thousands of dollars in water damage during a pipe failure.
- Check your water heater’s age and condition. If it’s between 8 and 15 years old and hasn’t been serviced recently, have a plumber inspect it and discuss replacement options. Annual flushing to remove sediment extends life and maintains efficiency.
- Watch for early warning signs. Low pressure on upper floors, rust-tinged water after non-use, slow or gurgling drains, musty smells near drain lines, water stains on ceilings or walls, or an unexplained rise in your water bill — none of these should be ignored. They’re your plumbing system asking for attention before it has to demand it.
- Schedule an annual plumbing inspection. A licensed plumber can walk through your home once a year, assess visible systems, check pressure, test sump pump operation, and flag anything developing before it becomes a problem. For a home with the age profile typical of Elmhurst, this is one of the most cost-effective things you can do.
A Note on Elmhurst’s Flood Control Investments — And What They Mean for You
The scale of what DuPage County and the City of Elmhurst have invested in flood control over the past three decades is genuinely remarkable. The Elmhurst Quarry Flood Control Facility — a converted limestone quarry that holds 2.7 billion gallons of floodwater and was specifically engineered to protect the Salt Creek watershed — is one of the most ambitious municipal flood control projects in the region. The city’s levee system, which protects more than 1,400 homes, represents years of planning and significant public investment.
These systems have made Elmhurst dramatically safer from overbank Salt Creek flooding than it was before the 1990s. But what they cannot do is protect your home from the water that comes through your own pipes, up through your own basement floor drain, or in through your own foundation during a storm that overwhelms the local drainage capacity.
That part is yours to manage. And the tools to manage it effectively — a properly maintained sump pump with battery backup, an understood and functional plumbing system, a sewer line you’ve actually looked at — are not complicated or extraordinarily expensive. They just require the intention to take care of them before something goes wrong.
Conclusion: Elmhurst Homes Were Built to Last — Give Your Plumbing the Same Standard
The postwar generation that built Elmhurst did so with purpose. The ranches and capes and split-levels that define so many of the city’s blocks were built to be lived in, maintained, and handed down. Many of them have been exactly that — homes that have housed multiple generations and are still standing strong.
The plumbing inside them has been working just as long, mostly without complaint. But it cannot work without limit. Galvanized pipe corrodes. Clay tile invites roots. Sump pumps age. Lead service lines sit quietly in the ground, doing what they’ve always done, while the understanding of what they mean for your family’s health has changed entirely.
You don’t have to fix everything at once. You do have to know what you have. Start there — find out what’s in your walls, what’s under your yard, and how your home handles the kind of rain that DuPage County sends every spring. From that knowledge, everything else follows.
Elmhurst is a great place to live. Your plumbing system, properly understood and maintained, should not be a reason to think otherwise.
About The Scottish Plumber
The Scottish Plumber provides 24/7 plumbing services across Elmhurst and the surrounding western suburbs. Our licensed, bonded plumbers specialize in older homes, sewer camera inspections, sump pump installation and battery backup systems, lead service line replacement, galvanized pipe replacement, and emergency repairs. We offer financing through WiseTack and Klarna and back our work with a workmanship guarantee.
Call us anytime at 888-MAC-CLOG or use this simple contact form.